Arduino Playstation 2 Controller Library Troubleshooting Guide
Posted in Arduino Libraries by Bill
27 Mar 2011
Ok, if you are here, you are having trouble getting your Arduino talking to your PlayStation 2 Controller via my Handy Dandy PS2X Library. Well, never fear, I stand by my leet coding abilities (Ha! who am I kidding? Really though, the library works, there’s tons of examples using it.) and I’m here to help. The problem is there’s not much I can really do unless you live near North Florida and want to come pay me a visit. It’s hard giving help over the internet! But maybe I can guide you in the right direction with this troubleshooting guide.
I’ll walk you through some debugging steps, and you should follow through with me with DEBUG off until I tell you to enable it and using the example sketch unmodified. In-between attempts, power off the Arduino and controller for 10 seconds before testing it again. I’ll bold the quick steps if you want to skim through.
A little background first. I have not personally reverse engineered the communications protocol a PS2 controller uses. That has been done by a few other cool guys like this one. I used what they reported in writing the PS2X library. As far as I know Sony has never official published the communications protocol to the public, so reverse engineering efforts is all we have to go on. This has lead to a few problems; for example some controllers just don’t behave like others. From the various sources around the web, the best chance of success comes from using ‘Official’ Sony controllers, and not the cheap knock-offs, 3rd party controllers. There’s also some links with wireless controllers not working well either. Personally I have tried a wired Sony controller, and a few wireless Guitar Hero Controllers all with success, powered at 5V and no resistors.
Therefore the first thing to consider is what controller are you using? Can you try another brand, model?
Ok, now that we are past history of controllers, I’ll tell you this: 90% of the problems people have end up being related to wiring. I can’t look at your setup, so you are going to have to use your best judgment. Does the wiring look sound? Controller wires are thin and small and tend to break easily. During prototyping, I cut the ends off my wired controllers, stripped 1/4″ insulation off and heavily tinned the wires to create solid ‘pins’ that could be pushed into the female pinheader on the Arduino. This method worked, but was fragile. Later on I bought a few $5 PS2 controller extension cables and cut off the female receptacle end. I soldered the wires from the plug to PCB board and that worked well also.
Don’t trust the color scheme on the wiring picture. It can vary! Instead, use a voltmeter and test continuity between pin positions in the connector and the bare wires. I’ve had a few people report odd color schemes, and a few not realize what end of the connector they were looking at and got the wiring completely backwards. A quick check is to power up the controller, and pushing the ‘Analog’ button. Either the LED should have been on when it powered up, or it should light up when you press the button. If not, the controller isn’t getting power and you probably have the wiring reversed.
Alright, so you trust the wiring job, what next?
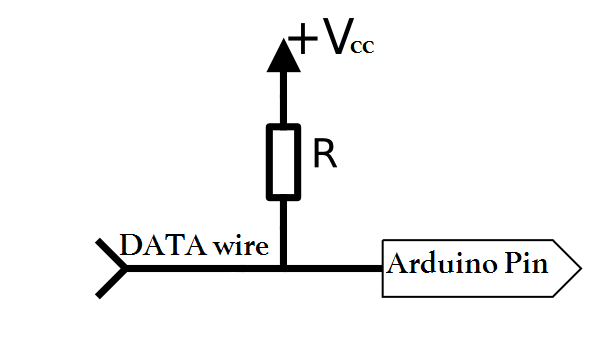
There are discussions over whether or not the controllers are tolerant of 5V logic. I’ve never had one burn out, so I believe they can handle “receiving’ 5V, but they still won’t ‘send’ 5V to the Arduino. It seems to me the one fix that seems to work the most is adding a 10k resistor between DATA (brown wire, or pin 1 on the controller port) and VCC (try both 3.3V and 5V in that order) on the Arduino.
This will help ‘pull-up’ the data line. Also there’s disagreement on what voltage to use to power the controller. A PlayStation powers the controller at 3.4V. I have always powered my controllers at 5V and had no problems, but it is risky. Controllers are so cheap on ebay though, why not try it? Try different voltages for power, switch between 3.3V and 5V, and for each voltage try it with and without the pull-up resistor on the DATA line .
One person claimed his controller wouldn’t work without level shifting all his wires, which means he just added resistors inbetween the controller’s pins and the Arduino.
The numbers he reported success with is as follow:
- 5V = 180 ohm, voltage drop of 1.85V (3.15v to the controller)
- ATT = 5.6K ohm, voltage drop of 1.08V (3.92 to the controller)
- CLK = 5.6K ohm, voltage drop of 1.15V (3.85 to the controller)
- CMD = 860K ohm, voltage drop of 1.39V (3.61 to the controller)
so you can give that a try as well. Though really, ignore the resistor on 5V and just connect the red power wire to 3.3V.
Some people report issues using pin 13 on the Arduino for CLK. Try moving the CLK line to another pin, and editing the example sketch to match.
If you have gotten this far and still no luck, you might just be out of luck. Controllers can go bad and some people just aren’t any good at wiring. But, there’s one more thing we can try messing with.
There’s a value in the ‘PS2X_lib.h’ file that governs the speed of the bus to the controller. It’s called ‘CTRL_CLK’ and you can find it by looking for this line:
#define CTRL_CLK 4
The PlayStation 2 talks to its controllers at 500kHz, or a value of ‘2’ in my library. Arduino tends to have issues setting a value that low, so by default I have it set at 4. You can try using 2 instead, and I’d also try using some higher number for a slower bus speed. Go from 2-20 and even 200 to see if you can get the controller talking. Remember to save the .h file every time you edit it, and re-compile the sketch.
Still no luck? Man you are killing me. I’ve dropped all my suggestions into this guide, so there’s not much else I can say even if you ask really nicely. Florida is nice year round, so feel free to come visit me and I will help you in person. Otherwise, you can try to enable debug. It won’t really help diagnosing wiring problems (or bad controllers) because all you will see is all FF’s or 0’s. But if you are getting some values, they may be something else going on. Drop the output in the Support Forum and I’ll see if I can help.
My last fleeting thoughts include removing the checks in the example. At the end of the setup function (after the switch statement and before the closing curly bracket ‘}’ ), add the following code:
error = 0;
type = 1;
This will bypass the error checking and run the code anyway. What do you get? Try pressing reset on the Arduino without disconnecting the controller. Anything?
Still need help?
Use the Support Forum to ask for help. Please don’t use the comments below.
Warning: Use of undefined constant single - assumed 'single' (this will throw an Error in a future version of PHP) in /homepages/46/d285670699/htdocs/bill/wp-content/themes/wordpress_survive/single.php on line 63
Warning: count(): Parameter must be an array or an object that implements Countable in /homepages/46/d285670699/htdocs/bill/wp-includes/comment.php on line 879
180 Comments.
Note: I personally have never been able to get a Logitech controller to work. I have had good luck with controllers by other manufactures, like Lynxmotion, or Madcatz, Sector 7… I have also heard others had similar issues with them. I do believe I did hear one person was successful, but I don’t remember which platform that was on.
Could be they are not at all tolerant of 5V on the power or signal wires. Could be like one controller I had (from Sector 7) only worked after I applied voltage to the Vibration pin. Could be picky about timing of signals…
Good Luck
Kurt
I have Sony PS2 controller, the only way I could get it to work is to set:
#define CTRL_CLK 200
when I first power up I get:
Found Controller, configured successful
Try out all the buttons, X will vibrate the controller, faster as you press harder;
holding L1 or R1 will print out the analog stick values.
Go to http://www.billporter.info for updates and to report bugs.
DualShock Controller Found
This seems to work perfectly (however apply 7.5V to the grey wire (toned out pin 3) does not make it vibrate)
However next time I reset it and the analog button is on I get:
Found Controller, configured successful
Try out all the buttons, X will vibrate the controller, faster as you press harder;
holding L1 or R1 will print out the analog stick values.
Go to http://www.billporter.info for updates and to report bugs.
Unknown Controller type
Did you try the other suggestions from the troubleshooting guide?
i try to connect ps2x to mega 2560 but in serial
Found Controller, configured successful
Try out all the buttons, X will vibrate the controller, faster as you press harder
holding L1 or R1 will print out the analog stick values
Go to http://www.billporter.info for updates and to report bugs
Unknown Controller type
but all thing work well ,the vibrating motor doesnt work although i connect the grey wire to 7.5 volt
A few people have claimed the vibrating motor not working. When I get time I’ll make sure it still works on my test setup. Can anyone verify their controllers vibrate?
I am using a controller made in china with no brand and the vibration does work.
NOTE: I am using 6 volts directly into the vibration pin without any other components, but don’t forget to use a common ground
I tried everything but the level shifting (lack of resistors)
Heck it works so i’m happy, just thought it was odd that with an official PS2 controller if the analog light was light it couldnt detect the controller type.
Sometimes on power up I have to reset it several times before it stops saying
“Controller found but not accepting commands.”
and starts saying
“Found Controller, configured successful”
perhaps its because the ctrl_clock has to be set so slow…
Hi Bill,
I’m having some strange problems:
If I connect my wireless PS2 controller to 3.3V with a pullup resistor, the controller connects to the reciever but won’t talk to the arduino.
BUT if I connect it to 5V with a pullup resistor on the data line the receiver talks to the arduino but won’t connect to the controller…
Haven’t a clue. Did you try the other suggestions from the troubleshooting guide?
Hey Andy.
Any luck? I just got a wireless controller from lynxmotion and I’m having the exact same problem.
I’m trying to connect the ps2 controller to my mega2560, but cant really get it to work, I have tried to change the ctrl_clk value, I tried to pot all the ports as instructed here, but I’m a bit new to all this, so.. Is this the only line I’m supposed to change to get the correct ports?
“error = ps2x.config_gamepad(15,13,14,12); ”
I connected the four wires to the analog input ports 12-15, and changed those values accordingly.
This is what I got when connecting it:
OUT:IN
1:FF 42:FF 0:FF 0:FF 0:FF 0:FF 0:FF 0:FF 0:FF 0:0 0:0 0:0 0:0 0:0 0:0 0:0 0:0 0:0 0:0 0:0 0:0
OUT:IN
1:FF 42:FF 0:FF 0:FF 0:FF 0:FF 0:FF 0:FF 0:FF 0:0 0:0 0:0 0:0 0:0 0:0 0:0 0:0 0:0 0:0 0:0 0:0
Controller mode not matched or no controller found
Expected 0x41 or 0x73, got FF
No controller found, check wiring, see readme.txt to enable debug. visit http://www.billporter.info for troubleshooting tips
OUT:IN Configure
1:FF 43:FF 0:FF 1:FF 0:FF
OUT:IN Configure
1:FF 43:FF 0:FF 0:FF 5A:FF 5A:FF 5A:FF 5A:FF 5A:FF
Unknown Controller type
OUT:IN Configure
1:FF 43:FF 0:FF 1:FF 0:FF
OUT:IN Configure
1:FF 4D:FF 0:FF 0:FF 1:FF
OUT:IN Configure
1:FF 43:FF 0:FF 0:FF 5A:FF 5A:FF 5A:FF 5A:FF 5A:FF
OUT:IN Configure
1:FF 43:FF 0:FF 1:FF 0:FF
OUT:IN Configure
1:FF 4F:FF 0:FF FF:FF FF:FF 3:FF 0:FF 0:FF 0:FF
OUT:IN Configure
1:FF 43:FF 0:FF 0:FF 5A:FF 5A:FF 5A:FF 5A:FF 5A:FF
OUT:IN
1:FF 42:FF 0:FF 0:FF 0:FF 0:FF 0:FF 0:FF 0:FF 0:0 0:0 0:0 0:0 0:0 0:0 0:0 0:0 0:0 0:0 0:0 0:0
OUT:IN
1:FF 42:FF 0:FF 0:FF 0:FF 0:FF 0:FF 0:FF 0:FF 0:0 0:0 0:0 0:0 0:0 0:0 0:0 0:0 0:0 0:0 0:0 0:0
Controller refusing Pressures mode, may not support it.
I also put a pull-up resistor on the data wire..
Those are odd pins to try and use. Why not just use the original pins in the example?
I tried now to connect them to 10-13(They are supposed to be on analog in, right? Also tried PWM, but same result), but still the same. My controller has the same color coding as the picture you have posted, or at least the same colors.
Do you know if there is some way of checking what wires do what, with just a multimeter?(Ohm or voltage values) Or would I need a Oscilloscope to do that?
Working like a charm now, never mind. 🙂
I was having the same problem, what did you do to fix it? Please help
Hi Bill
I’m new to programing with Arduino so I might be makeing a mistake somewhere but I can get the code to work because it keeps saying
‘PS2X’ does not name a type
any help you could give would be great
thanks
Hi Sam,
It sounds like you didn’t unzip the library into the ‘libraries’ folder correctly. Make sure the ‘PS2X_lib’ folder with the .cpp and .h file (not in another folder) is in “C:\Users\[username]\Documents\Arduino\libraries” folder.
Thanks Bill
I hadn’t even thought of that 🙂
its working perfectly now .
Thank you Bill for an awesome tool and your efforts to support it.
I’m using your library for a wireless remote control for my Halloween display (via UNOs w/ Xbees)
Hiya,
thanks for this library and tutorial im learning a lot about arduino and controls.
I set my arduino up, controller and it seems to be working in a strange way.
I went through the trouble shooting guide which helped with setting up (very helpful).
It seems the controller and arduino talk and everything works, its just I have to click on “serial monitor” to see what stuff is happening and it is not on english at all..
I know that each button is working cause when i press it it prints onto the screen. I’ll show you an example of what it prints.
“5ÿ/x°®áñBìñx©ÿx©ñz¹¯ûò,n(¢þ,n( þþÿÿþÿÿÿÿÿþñÒðñòðñññððññðññòñññòðy¨ñx©òy©òy¨ðx¨ñx¨ñy¨ðy¨ñy©òy©òBoð¯ûÿz¹¯x©ñy¨ðBoð®áðz¸.{¹/z¹¯Boðx©ñy©ò¯àòθ.Ròÿ((ÿ,n#.n(àþÿ(åÿ.n(eÿðððñðñθ.x¨ñy¨ðy¨ðy¨ðx©òx¨ñ{¸.z¹/y©ñx¨ñx¨ñy¨ðBoòBìðBìðñññññúûññññ.n((þ-n”
It prints this all on one line in the “serial monitor” window.
any idea whats going on?
arduino is Arduino Duemilanove 2009 Compatible AVR ATmega168-20PU USB Programming board
and the controller is a no name replica Ps2 controller off ebay.
cheers,
Rhys
ok scratch that.
void setup(){
Serial.begin(57600);
I just needed to change the “Baud” from 9600 to 57600 in the serial monitor window
I have the same problem, dow did u solve that?
It seems everything is working, I’ve tested 2 controllers, and both appear the same caracters.
thank for you help.
Bill,
A couple of months back, I touched base with you about an arduino project that enabled a nintendo nunchuck to control a pan/tilt head for a video camera (a Bescor MP101). Thanks to your help the project was a success.
I am now trying to modify that project to enable the pan/tilt head to be run by a PS2 controller instead of the nunchuck controller. I think the PS2 controller will provide smoother control plus it will provide a lot more available buttons to program.
So far I have managed to successfully install your PS2 library and wire up my PS2 controller after utilizing the 10k pull up on the data line. The serial port is now reading the PS2 controller perfectly.
My problem is that I cannot figure out how to modify my original project code to enable the PS2 controller to control the pan/tilt head. I am still new to the arduino world and I have searched the internet for hours to figure out how to use your library to run my sketch and I haven’t been able to figure it out. I am sure it is something simple that I am missing. I would really appreciate it if you could help me get started. Once I see how it works I am sure that I can get it.
Below is a link to the current project code that works with the nunchuck:
http://protechy.com/bescor-mp-101-and-arduino-v2-4/
Would you be willing to show me how to tweak the original code so as to enable the PS2 to do what the nunchuck is now doing. Once I see how you have done it, I believe I will then be able to figure out how to expand the code to use the additional buttons on the PS2.
Ultimately, I would like to have the PS2 be able to send the left/right and up/down pan signals to the pan/tilt head via both the left joystick control as well as the d-pad. This way I can determine whether the joystick or the d-pad will provide the best tool for smooth pan and tilt.
Also I was hoping to be able to press the L1 or L2 button while moving the joystick or d-pad and trigger an accelerated pan/tilt of the pan/tilt head. Basically, whenever the L1 or L2 button is pressed and the joystick or d-pad moved the speed variable would be doubled to produce a faster pan than when the L1 or L2 button was not depressed and the joystick or d-pad were moved.
If you have the chance to take a look at this I would really appreciate your help. Thanks again for all the hard work you have put into your PS2 library. Hopefully we can leverage it for this project.
Sincerely,
Rick
I tried many times but succeded only with 2 analogs and select and start button and that also pulling up the data line. For other button I am posting this error code ,help me out.
1:FF 42:FF 0:FF 0:FF 0:FF 0:FF 0:FF 0:FF 0:FF 0:0 0:0 0:0 0:0 0:0 0:0 0:0 0:0 0:0 0:0 0:0 0:0
OUT:IN
1:FF 42:41 0:5A 0:1F 0:40 0:0 0:0 0:0 0:0 0:0 0:0 0:0 0:0 0:0 0:0 0:0 0:0 0:0 0:0 0:0 0:0
Found Controller, configured successful
Try out all the buttons, X will vibrate the controller, faster as you press harder;
holding L1 or R1 will print out the analog stick values.
Go to http://www.billporter.info for updates and to report bugs.
41Unknown Controller type
OUT:IN
1:FF 42:41 0:5A 0:1F 0:40 0:0 0:0 0:0 0:0 0:0 0:0 0:0 0:0 0:0 0:0 0:0 0:0 0:0 0:0 0:0 0:0
OUT:IN
1:FF 42:41 0:5A 0:1F 0:40 0:0 0:0 0:0 0:0 0:0 0:0 0:0 0:0 0:0 0:0 0:0 0:0 0:0 0:0 0:0 0:0
OUT:IN
1:FF 42:41 0:5A 0:1F 0:40 0:0 0:0 0:0 0:0 0:0 0:0 0:0 0:0 0:0 0:0 0:0 0:0 0:0 0:0 0:0 0:0
OUT:IN
1:FF 42:41 0:5A 0:1F 0:40 0:0 0:0 0:0 0:0 0:0 0:0 0:0 0:0 0:0 0:0 0:0 0:0 0:0 0:0 0:0 0:0
Right held this hard: 0
LEFT held this hard: 0
DOWN held this hard: 0
Stick Values:0 0
0 0OUT:IN
I am trying to verify the code, to load it to the arduino board, but i get an error of ‘class PS2X’ has no member named ‘config_gamepad’ I dont now what to do to fix this issue, can u help me please. Thanks Mike
I need some assistance.
I have the latest version of the PS2 library and I’m trying to verify the codes.
But every time I do so, I keep getting these errors:
“expected constructor, destructor, or type conversion before ‘=’ token”.
” expected unqualified-id before ‘{‘ token”
They are always around the “error = ps2x.config_gamepad(13,11,10,12)”
I tried everything I could do; move the constructors, deleted some, added some.
But overall, it’s like trying to solve a rubrik’s cube.
I’m new with the arduino and I’m trying to gain some programming experience. So could anyone assist me?
I know I fixed a compile issue maybe 6 months ago in my fork of the ps2x code… Not sure if it got propagated to main fork? It would only give a compile error, if you go to the header file, check to see if debug is turned on or off…
//#define PS2X_DEBUG
//#define PS2X_COM_DEBUG
If you turn it off by commenting it out, like above, does the compile error go away? If so it is the problem from 6 months ago.
It has to do with moving two lines out of a for loop.
char dword[9] = {0x01,0x42,0,motor1,motor2,0,0,0,0};
byte dword2[12] = {0,0,0,0,0,0,0,0,0,0,0,0};
This is at about line 100 of the PS2X_lib.cpp file. If it is there, move the two lines up about 8 lines to just above the for (
line…
Kurt
where is the basic pinout on the Arduino side? I found some pins hidden in the example code:
error = ps2x.config_gamepad(13,11,10,12, true, true); //setup pins and settings: GamePad(clock, command, attention, data, Pressures?, Rumble?) check for error
but there’s not clear pinout for your library! Where should my ACK pin go?
ACK is not connected. The pinout can be anything you want but, by default, it is:
clock –> 13
command –> 11
attention –> 10
data –> 12
ground –> any ground
vcc –> any vcc (5v or 3v3)
vibe power –> ~8v or not connected (I think)
acknowledge –> nothing
Bill,
I tried the library with an off brand controller and an UNO and couldn’t get past
“Controller mode not matched or no controller found” – I tried switching pins, all the resistor suggestions on page 2 of this thread, no luck; today I bought a genuine Sony and have the same results; when I implement your error = 0; type = 1; suggestion I get this repeating endlessly:
OUT:IN
1:0 42:0 0:0 0:0 0:0 0:0 0:0 0:0 0:0 0:0 0:0 0:0 0:0 0:0 0:0 0:0 0:0 0:0 0:0 0:0 0:0
Start is being held
Select is being held
Up held this hard: 0
Right held this hard: 0
LEFT held this hard: 0
DOWN held this hard: 0
Stick Values:0,0,0,0
I’m a noob when it comes to Arduino/electronics, but am a senior software developer and know how to check my work, i.e. pinouts are triple-checked and correct, yet I feel like I’m missing something horribly obvious – any ideas?
All my ideas went into the troubleshooting guide. Be sure you check your wiring against the pin position in the controller connector and not by wire color, as the wire colors may change. Also make sure the red analog light comes on/off when you push the analog button. Also enable the full debug so it dumps the raw data to the serial terminal and post it in the forums. http://www.billporter.info/forum/forum/ps2x-playstation-2-controller-library-support-forum/
Thanks Bill, turns out it needed the 10K pullup on the data line. Works fine now.