Ana’s Perimeter Defense System; Configuring Xbees for Remote IO Reading
Posted in Projects, Tutorials by Bill
15 Dec 2011
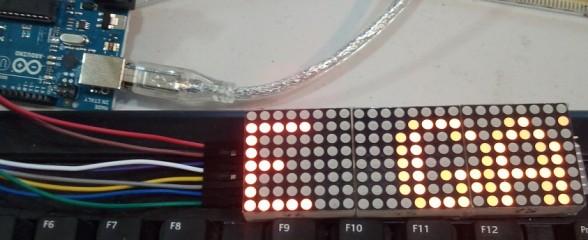
A coworker of mine is soon retiring and moving to South Florida. Her new house has a screened in front porch and side gates for back yard access. The gates can’t be kept locked as the meter readers need access and her front porch is open. She came to me wanting to build a system that would alert her to anyone walking onto her porch or past her side gates and I was more then happy to help. In the process I figured out how to configure Xbees to use API mode and act like remote I/O modules, and have a tutorial to show you how to do it as well.
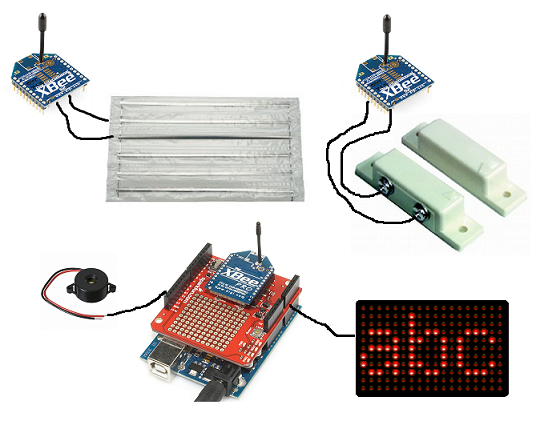
She wanted to have a wireless system with multiple monitoring points all report to a base station with an indicator that could convey which zone was tripped. Ana knew Arduino was the place to start, but didn’t know much about them nor how to use one for this purpose. She already had the sensors in mind, a pressure mat from Trossen and some alarm magnets. For the rest of the system we discussed options and settled on Xbees for their ability to directly interface IO and support for multi-node networks and the pre-existing Xbee Arduino library for API functions.
The Setup
The base station consisted of an Arduin Uno mated with a Xbee shield with the base unit Xbee. There is also a small buzzer from RadioShack to alert Ana when a zone has been tripped. But that’s not all. I also gave Ana a few prototypes of a kit I am designing called ‘ShiftTrix’, an inexpensive LED matrix carrier.
Including the LED matrix, each 8×8 driver board cost about $11 in parts making the modules more affordable then serial driven carriers. Instead of dedicated microprocessors on each block, all the blocks are driven by the main Arduino Uno via shift registers. The blocks connect to each other making for a chain of any length up to about 10-15 depending on the ability of the driving processor. This is actually the way many professional LED matrix modules are driven and has been done before in the hobby world. This is just an affordable implementation of the design to make LED matrix modules easy to work with.
The remote Xbees are connected to a battery pack and to a sensor. When the sensor s activated (either the mat stepped on or the magnetic alarm switch activated) a circuit is completed between the I/O line on the Xbee and GND, pulling the I/O line low.
For testing purposes I used a push button to pull the I/O line low.
The theory of operation is simple, use the Xbees IO function to monitor the sensors, and report back to the base station when a zone is tripped.The Arduino is running the Xbee API library to make sense of the API packets received, and then drives the buzzer and states which zone is tripped on the LED matrix.
The code running on the Arduino is pretty simple thanks to the Xbee API library:
void loop() {
  //attempt to read a packet
  xbee.readPacket();

  if (xbee.getResponse().isAvailable()) {
    // got something

    if (xbee.getResponse().getApiId() == ZB_IO_SAMPLE_RESPONSE) {
      xbee.getResponse().getZBRxIoSampleResponse(ioSample);

      //see if the pin we want is low
      if (!ioSample.isDigitalOn(1)){

        //Turn on buzzer
        digitalWrite(BUZZER,HIGH);

        //lets check to see which radio is is from, and send it to the screen.
        if (ioSample.getRemoteAddress64().getLsb() == frontdooraddressLSB)
          scrollText(msgFront, sizeof(msgFront), RED); //display "Front Door" in RED
        else if (ioSample.getRemoteAddress64().getLsb() == sidedooraddressLSB)
          scrollText(msgSide, sizeof(msgSide), YELLOW); //sisplay "Side Gate" in YELLOW

        //turn off buzzer
        digitalWrite(BUZZER,LOW);

        //CLEAR THE SCREEN
        scrollText(msgClear, sizeof(msgClear), GREEN);

      }
    }
    else {
      scrollText(msgError, sizeof(msgError), GREEN);
      scrollText(msgClear, sizeof(msgClear), GREEN);
    }
  }
  else if (xbee.getResponse().isError()) {
    scrollText(msgError, sizeof(msgError), GREEN);
    scrollText(msgClear, sizeof(msgClear), GREEN);
  }
}
The complete source sketch can be downloaded here: Ana Alarm Sketch
Testing the system:
And the final product?
Ana is going to her new house for the holidays and will install the system. I’ll update this page if she ever sends me pictures or video of it installed.
Where’s the Tutorial?
Ah yes, I did mention this was a tutorial as well. When we started planning for this project, I knew Xbees could be configured to act as remote I/O devices, but have never tried it before. I searched around a bit looking for a guide on how to configure the Xbee for remote IO reading using the Arduino Xbee library, but didn’t find anything useful. I ended up guessing and actually got it to work on the first try. What luck! So I’m paying it forward and will walk you through the configuration real quick. Note, this is only how to configure the radios to act like remote digital IO ports, not wireless serial links.
Configuring the Xbees
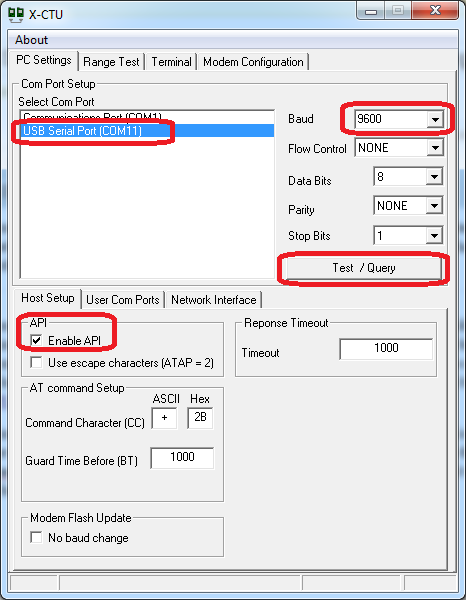
First, you need to connect the first Xbee that will be used for the base station to your computer. You can use an USB carrier like this one for that. With the Xbee connected, run the X-CTU utility you can download here. Your first screen will look like the picture below.
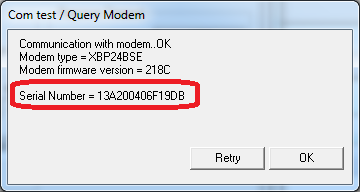
Make sure the fields highlighted in red match, thought the Com port number (COMXX) will be different. Hit the “Test / Query” button to make sure your Xbee is talking. You should see:
Save the serial number for your radio. We have to enter this address into the remote XBees when we configure them later. Select OK.
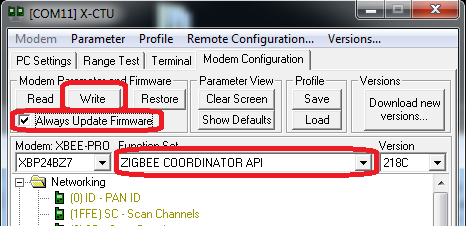
Then select the “Modem Configuration” tab in the main window.
Check “Always Update Firmware” and change the ‘Function Set’ to “COORDINATOR API” option. Then push “Write to update the Xbee.
That’s all we need to do for the Xbee that will be on the base station. Now switch out the connected Xbee for one of the Xbees that will be used in the remote location attached to the sensors. Repeat the first step in X-CTU where we tested the connection to the radio, then select the “Modem Configuration” tab. We don’t need to remember the address of these Xbees.
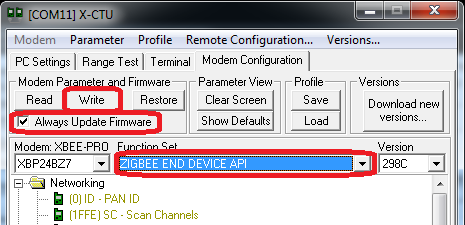
This time select “END DEVICE API” as the function set, check “Always Update Firmware” and click “Write”.
When the update is finished, you should get a screen like this:
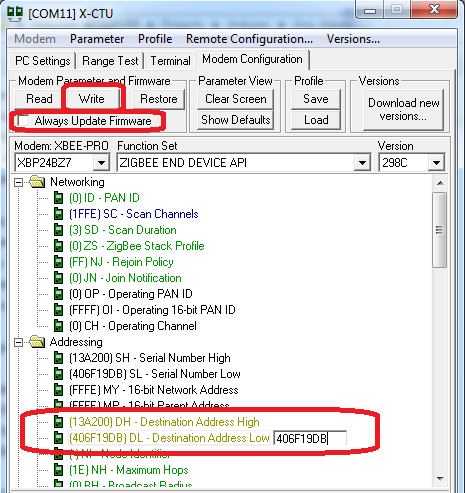
Clear the check next to “Always Update Firmware” and scroll down to the “DH – Destination Address High” and “DL – Destination Address Low” fields under Addressing. Click on the first one, and in the box that shows up, type the first 6 digits of the Address you wrote down from the first radio. Click on the second and type in the rest of the address.
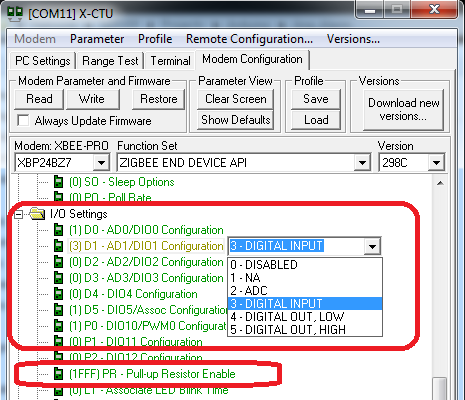
Then scroll down to the “I/O Settings”:
For this project, we only needed one Digital I/O pin, so we used D1 since D0 is usually reserved for another function. Select “D1 – AD1/DIO1 Configuration” and select “3 – Digital Input”. Repeat for the other I/O pins you want to use. Also note the internal Pull-up resistors are all enabled by default. This is good, as we need them to be enabled.
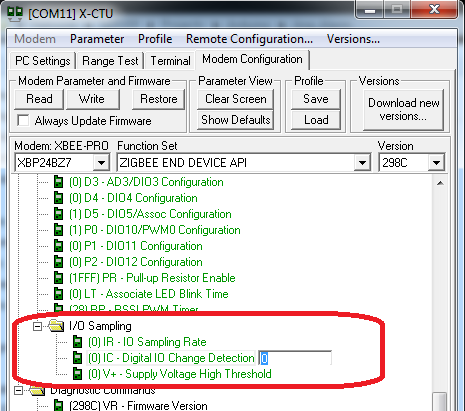
Scroll down a bit further to the “I/O Sampling” sub-section and click the plus to expand the options.
There are two options here. We can either send a packet of I/O information at a set interval using the “IR – IO Sampling Rate” or have the Xbee send a packet if a I/O pin changes by enabling “IC – Digital IO Change Detection”. On this project we enabled change detection by entering in FFFF in the “IC” field so that the remote Xbee will only transmit if it detects a change.
If you want to send a packet at a set interval, give “IR” a value from 0 to FFFF. The numbers are in hex and represent the time in milliseconds between packets. So the max is 65 seconds between packets.
Click “Write” at the top of the X-CTU window and pat yourself on the back, you are done! Well, with these two anyway, if you want to setup another remote Xbee, repeat the steps you took on this one.

