
The Engineer’s Guide to DIY Computer Controlled Holiday Lights
Posted in Projects, Tutorials by Bill
7 Jan 2017

Three years ago, I became a first-time home owner. Beside the overwhelming freedom to hack my new dwelling as I saw fit, I was excited I finally had a canvas with which to paint with crazy holiday lights. You see, I grew up decorating my parent’s house as a kid. I’d use thousands of incandescent (incans) lights to make my parent’s house glow every year. I had to take hiatus when I went to college and through the following 5 years of apartment renting. During that time the ‘light hobby’ exploded with computer control, communities rose and fell and new technologies were created. I’m sad I missed its infancy, but was finally excited to jump in with two feet.
But I hit my first snag. All the information for newcomers was written for non-engineers. IE, the level of “This is a wire, electricity flows in a complete circuit, bla bla bla”. That’s fine for any non-engineer that wants to put blinky blinky on their house like they see on TV, but I’m an electrical engineer. I just wanted to get to the nitty gritty of what technologies I needed to learn, what devices would help me get started, etc. Sadly, I never found a good source of information and instead read over pages and pages of wiki articles and forum posts aimed at the non tech savy. After 2 years and 4 holiday shows I feel I have a good handle on the community now, and I’m writing this for any other tech geeks that want to follow suit. Why now, in January? Because you have to start now to be ready for the holiday season this year. Prepare for a crash course in CLAP. (Christmas Light Addiction Problem)

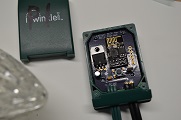 This is a build guide for ESPixel GECE a WiFi pixel controller for General Electric Color Effects (GECE) pixels. This also includes iTwinkle by GE. Based off the ESP8266 chipset, this design will replace the original controller on the strand and turn the string into a full fledged e1.31 sACN device. The firmware includes a web server that allows the end user to adjust the various settings. This guide will take you through assembly with the assumption you know how to solder parts to a circuit board.
 This is a build guide for RenardESP, a WiFi adapter for Renard Christmas light dimmers. Based off the ESP8266 chipset, this adapter will turn your Renard dimmer into a full fledged e1.31 sACN device. The firmware includes a web server that allows the end user to adjust the various settings. This guide will take you through assembly with the assumption you know how to solder parts to a circuit board. WIP
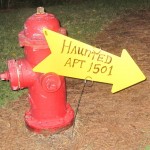 Ok, I know I’m late on posting this, but that pretty much sums up this project: Doing things at the last minute made possible by Open Source. Rewind you calendars to October 25. That’s the day I learned my apartment complex wanted to put on a haunted house and asked me to help. I agreed, worried that Halloween was in 6 days. What could I possibly throw together? I had to do it cheap, and I had to do it quickly. I only had 3 week days to get items ordered and delivered and one night to get everything together and working. If it wasn’t for the large open source community behind Arduino, I couldn’t have gotten this done.
DIY Museum Exhibit – Reaction Time Challenge
Posted in Education Outreach, Museums, Projects by Bill
24 Aug 2013
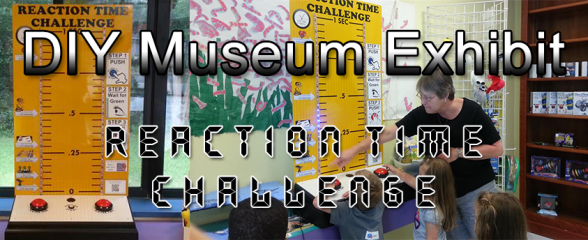
Ok, so I have a thing for local Science Museums. What are you gonna do about it? Me, I built an exhibit from scratch and donated it to the Science and Discovery Center of Northwest Florida. This exhibit is a simple game that pits two people against each other to find out who’s got the faster reaction time; and learn some things on the way! Powered by an Arduino, the electronics and construction are so basic I’m posting everything on GitHub and here for others to clone or improve upon. I bet there’s a local science museum near you that would love an exhibit like this. *wink*wink*
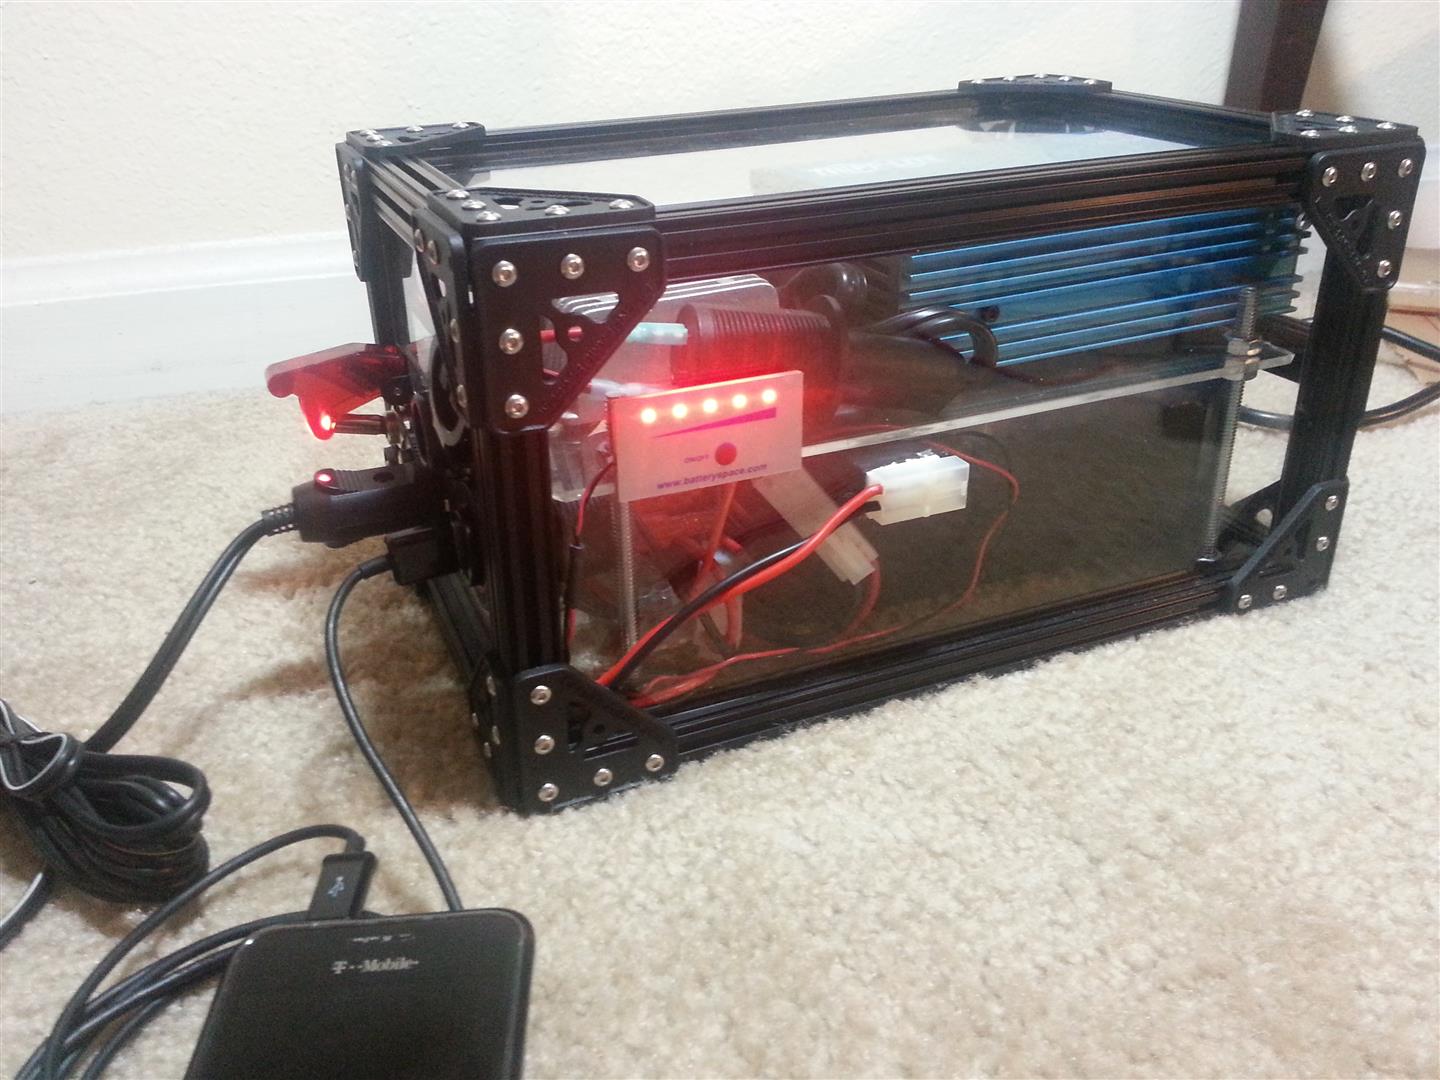 Well, just like the other 650,000 civilian employees of the DoD I suddenly find myself faced with a 20% pay cut and seemingly endless 3 day weekends. What’s a guy to do? O that’s right, when don’t I have crazy home projects clogging up desk (or floor) space? Well with the extra free time I can start and end some of the projects that I’ve had on the back burner. First up is one of those kind of projects where it’s not so much “Why?” as it is “Why not?”. I had some high energy density batteries lying around and a recent string of power outages have been leaving me in the dark more often than I care for. So in true hacker fashion, I built something: BatBox, just like in Minecraft. My real life version can supply 5V USB power, 12VDC and 110VAC at 240W for about 2 hours. That’s enough to run my dual head desktop 4x longer than it’s current battery backup.
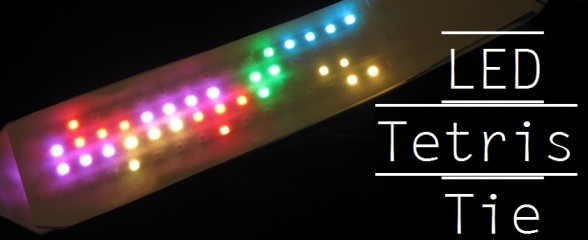
The first iteration of this project went from initial idea to working prototype in about 4 hours, a new record for myself and a testament to the power of open software/hardware. I had been teaching at the FSU STEM Camp all week with my usual geek attire (8-bit tie, PCB tie, LED Lab coat) and the kids asked me what ‘outrageously cool’ thing I was gonna wear on the last day. The problem was I had nothing left in my closet and feared I would let them down. So when I went home exhausted that night (it’s tough teaching over 100 8th graders to solder!) and sat down at the work bench trying to decide what I could do in a night. Inspired by Adafruit’s Amplie-Tie, this is what I came up with.

Mara and I met in college, both getting our B.S in Electrical Engineering. We are both true passionate geeks; we love to tinker and create things. So it’s no wonder why we put so much into creating a truly original Geek Wedding. There was a lot of 3D printing involved, meters of wire used on our clothes; we even used a soldering iron during the ceremony. We developed a lot of useful stuff during the creation phase, and of course everything is Open Source.
Part 5 of the tour through Our Geeky Wedding focuses on the clothes we wore for the wedding. Or, technically what we did to the clothes we wore for our wedding. Of course in a wedding with an engineering theme only one thing comes to mind when you think of the attire: e-textiles!
When it came time for Mara and I to draft our wedding ceremony we pondered how we could incorporate an element from our theme. We had 4 days to go and only some vague ideas. Mara bought some wood letters to spell out ‘I Do’ and wanted to use them in the ceremony. We also joked about using a soldering iron during the ceremony; but how could we do it tastefully? Then it hit us, a common wedding ceremony know as the “Fishermen’s Knot” could be reworded for something a little more geeky. Yes, we really did solder some wires together in the middle of our wedding, with a Weller soldering iron Mara bought me for a past birthday no less. And you won’t believe what PCBs came in handy for the build…