
The Engineer’s Guide to DIY Computer Controlled Holiday Lights
Posted in Projects, Tutorials by Bill
7 Jan 2017

Three years ago, I became a first-time home owner. Beside the overwhelming freedom to hack my new dwelling as I saw fit, I was excited I finally had a canvas with which to paint with crazy holiday lights. You see, I grew up decorating my parent’s house as a kid. I’d use thousands of incandescent (incans) lights to make my parent’s house glow every year. I had to take hiatus when I went to college and through the following 5 years of apartment renting. During that time the ‘light hobby’ exploded with computer control, communities rose and fell and new technologies were created. I’m sad I missed its infancy, but was finally excited to jump in with two feet.
But I hit my first snag. All the information for newcomers was written for non-engineers. IE, the level of “This is a wire, electricity flows in a complete circuit, bla bla bla”. That’s fine for any non-engineer that wants to put blinky blinky on their house like they see on TV, but I’m an electrical engineer. I just wanted to get to the nitty gritty of what technologies I needed to learn, what devices would help me get started, etc. Sadly, I never found a good source of information and instead read over pages and pages of wiki articles and forum posts aimed at the non tech savy. After 2 years and 4 holiday shows I feel I have a good handle on the community now, and I’m writing this for any other tech geeks that want to follow suit. Why now, in January? Because you have to start now to be ready for the holiday season this year. Prepare for a crash course in CLAP. (Christmas Light Addiction Problem)
I don’t claim to be an expert on all historical facts or really have complete knowledge of the scene, but I hope to do a fair job presenting you with enough knowledge to tackle this hobby should you choose to do so. I also don’t intend to imply this is an all-inclusive run through, I’m going to focus on products, people and companies I feel are the best at what they do compared to the alternatives. The Wiki is a good place to go if you want the most extensive overview. I did not receive any reimbursement for my vendor recommendations.
Top Level
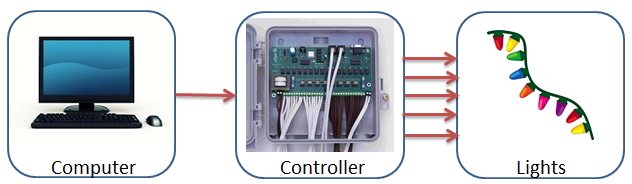
Ok, let’s start at the top down, and I’ll be quick here as most techies would guess this upfront. Fundamentally the architecture of crazy controlled lights is a computer connected to a controller connected to the lights.
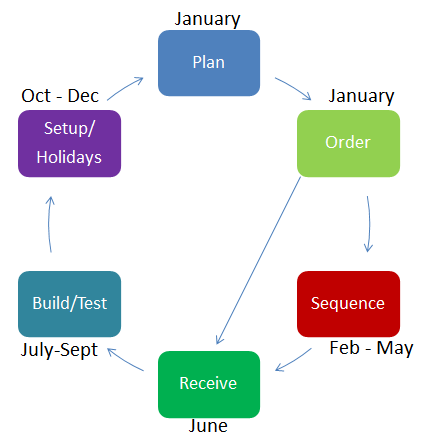
And the schedule milestones look something like this. It really does take all year to make this happen, so don’t wait till October to jump into this. You have to start planning now.
I’m a hardware guy, so let’s start dissecting the top level overview first and talk about the different aspects of the system.
Hardware
We are quickly going to break into two different paths. We’ll start with the original ‘Christmas Light’ technology first: mains voltage incandescent lights.
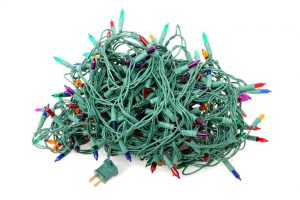
These are the lights everyone knows and loves, available at most stores around you. In order to control them, you need a controller or dimmer to regulate power to them. The first popular mains voltage DIY light dimmers are called ‘Renard’ dimmers.
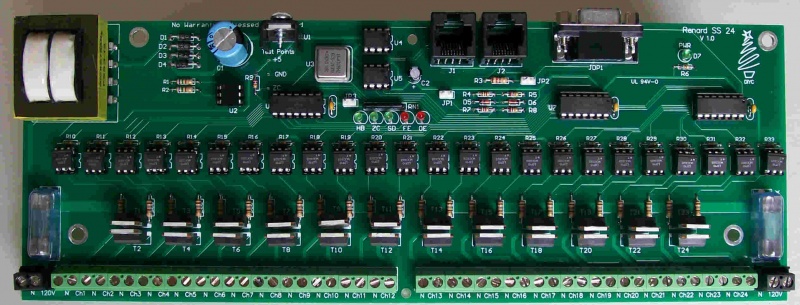
From what I’ve gathered their design almost started as a dare. A bunch of Christmas/Computer geeks wanted to see if they could build a dimmer using a PIC coded in assembly at a cost much lower than commercial offerings. They connect to the computer using RS-485 over CAT-5. This made long wire runs through the yard possible. Each Renard has either a RS-485 input or RS-232 input selectable with jumpers. So you can plug 232 into the first Renard, and daisy chain the rest off of the first over RS-485. After the first few revisions and mods, a standardized BOM was created which is call the Renard ‘SS-x’ series, where x is the number of control channels. Common designs are SS-8, SS-16 and SS-24. They still use PICs and assembly. Each PIC controls 8 channels, so the 16 and 24 channel variants just have more PICs onboard. They operate with the common and inexpensive phase angle dimming approach with an optoisolator for zero cross detection.
Pixels
Then the addressable LED came about. The affectionate ws2811 was one of the first to become very popular in the hacker world as much as the Christmas light world. Some standardized form factors were created, namely the 12mm ‘bullet’ node as well as some interesting rectangular/square modules.
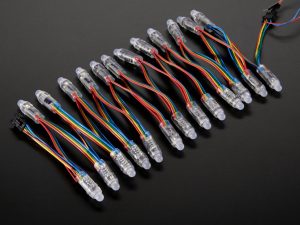
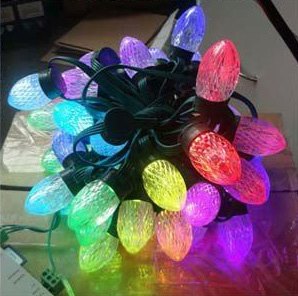
But 12mm node is king for usage and availability. As many people enjoyed the form of old C9 bulbs, there are also a few offerings of pixels with plastic diffusers meant to look like C9s. If you are familiar with GE’s commercial pixel product, ‘Color Effects’ you know what I mean. My go to DIY product in this category is PixaBulbs.
Two voltage ‘standards’ were created: 5V pixels and 12V pixels. The biggest hurdle in building your display is fighting the voltage drop over power wires. 5V are the cheaper and more efficient pixel, but 12V affords more pixels per run. Some types of pixels will put two or three LEDs in series to allow for better efficiency while operating at 12V.
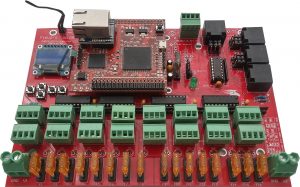
Controllers
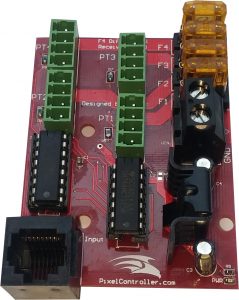
To drive these pixels, controllers had to be created that could receiver data from the playback device and convert it to the pixel protocol. The first few controllers took in Renard or DMX data and converted it to pixel data, but the channel limits of both serial based protocols quickly became a limiting factor. DMX was only good for 170 pixels and Renard less than that. Soon the scene adopted an IP based protocol and started to see IP based pixel controllers. The first few were powered by Propeller MCUs and had some interesting limitations like grouping 4 outputs into a logical ‘port’ that had to be set as one pixel type. I suspect this is due to how the cores were assigned to do the bit banging of the protocols. Pixel limits started at 1000 to 2000 pixels per controller and started off an arms race to the next new limit.
Then David Pitts came along. He designed a board based that partnered an MCU with an FPGA and raised the bar. 10,000 pixel output at 40Hz update rate was possible. The MCU handles the math and Ethernet communication while the FPGA generated the pixel protocols. His Falcon controller seems to be the supreme controller on the scene right now, in my opinion. Better yet, he gives out his cell phone number to any members having issues and is a regular in the forums where he is still one of the few that openly discusses some design aspects and future improvements. Not quite open source/development, but still pretty close.
Playback
With the explosion of channel counts brought on by the pixel age, they were some rumblings of a way to offload the show scheduling and playback from a full blown computer to something a little more, tasty. The Raspberry Pi could more than handle just reading back values and sending them over IP, right? Right! The new idea of offloading playback changed our workflow and system diagram a bit:
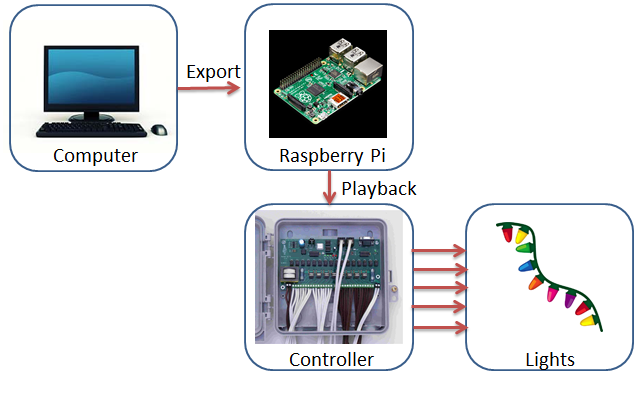
Now after sequencing a new step of export is added to take the native sequencer files and convert them to a format the Raspberry Pi can playback.
The software that runs on the Pi is aptly named FPP (Falcon Pi Player) though now that ports exist for BeagleBones they are trying to get us to adopt ‘Falcon Player’ as the new name.
The very latest trend now with even more 100k+ channel counts is to have multiple FPPs each serving up a section of the display and staying synchronized with each other over the network. This is called master/slave mode. The next generation of pixel controllers will likely have SD cards on board and act as an FPP slave themselves, only requiring a sync packet over the network opposed to raw pixel data.
Protocols
Early controllers used either the well-known DMX protocol, or the community created Renard protocol for the Renard dimmers (easy to remember, right?) Renard is a dead simple binary serial protocol with addressing. It has a header byte, an address byte and an escape byte. I’ve written a few Arduino libraries to talk Renard.
When the shift to IP communications came about, the lighting control over IP standard sACN or e1.31 was adopted. This protocol borrows the idea of a group (or universe) of 512 channels from the DMX scheme and packs it into a UDP packet. A numerical ‘universe ID’ is assigned for each group of 512 channels. There is a max of 63999 universes allowed for a total of 32 million channels. I don’t think we’ll hit that limit for a long while. The protocol can be used as a multicast packet or unicast. Since most consumer network switches aren’t multicast aware, multicast is effectively treated as broadcast and floods the network. Hence most of the community uses it in unicast mode, however with the advent of small cheap wifi pixel controllers multicast usage can be used for an advantage of efficient airwave usage.
Other Standards
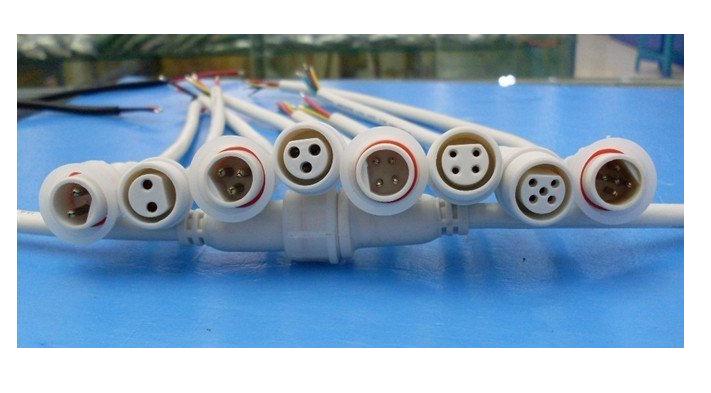
The community as a whole seems to have adopted these 3 and 4 pin waterproof plugs as a standard for connecting pixels. Though depending on if you buy pre-terminated pixel strands and from whom you buy them, the pinout can be different. Oi.
The common go to cable for Data is Cat 5. We use it for DMX, Renard, networking (duh) and pixel data itself. There’s been a recent introduction of ‘long range’ pixel controllers that use 485 or 422 transceivers to send pixel data longer distances. This of course requires a ‘receiver’ board at the end of the run before connecting to the pixels.
I prefer wiring with these type controllers as normal pixel communications is only good for 10-15 feet before noise becomes an issue.
When you build elements such as grids and pixel trees, most sequencing software assumes pixel 1 is the lower left pixel, pixel 2 right above it, and so on. So if you adopt this as a standard wiring scheme, it will make patching channels to pixels much easier. Don’t worry about zig-zag wiring, as most controllers can logically flip the data around to correct for you, making patching dead simple.
Software
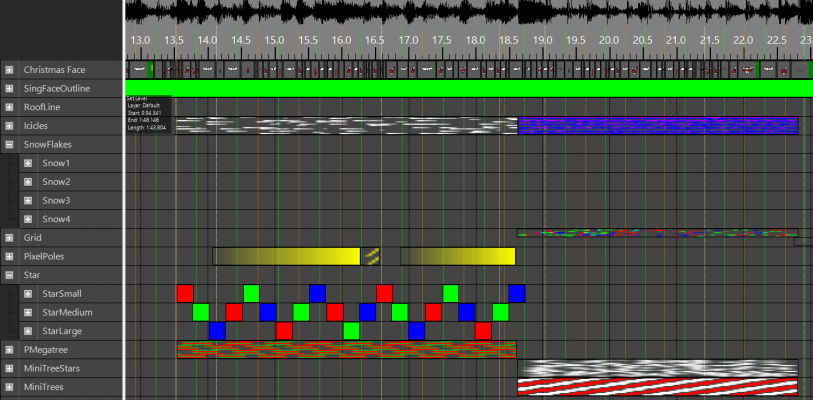
There are a few major camps here for sequencing software. The top two are Xlights and Vixen. Vixen has been around longer, it was an early free alternative to Light-o-Rama product line. Early versions were for AC lights only, and the onset of pixels bought about major design changes.
Xlights, originally called Nutcracker, was written as a plugin to add early pixel support to sequencers like Vixen. It eventually became its own sequencer, and it seems to be more popular now among people who are heavily into pixels.
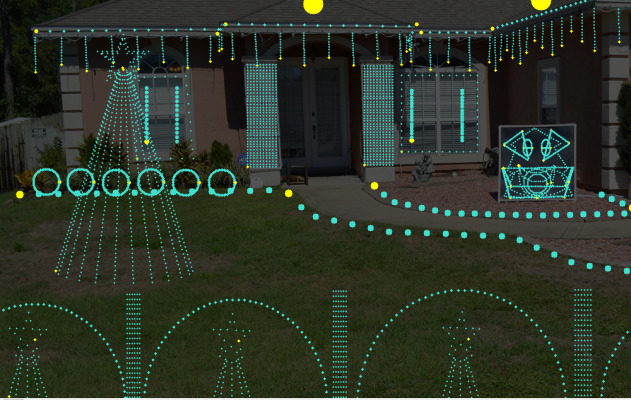
All software had a premise to model your house, usually by importing a picture of it, and ‘laying out’ all the lights onto the picture where they are in real life. This allows for the really cool looking effects that need pixel mapping, like spirals and wipes over multiple elements at one. And the best part is all this software is free to use. So there’s nothing stopping you from downloading it and playing around.
There are many, many other sequencers out there, HLS deserves a mention. However I don’t know much about it.
Open Source and Other Drama
When I jumped in feet first, it took me a while to feel out the community in regards to being Open Source. By the strictest definition, it’s not open source at all. Though some common elements, like Renard dimmers, have schematics and board layouts all posted in wikis. Firmware updates are distributed in code and binary form. And like the OSHW community, there seems to be a set of unspoken guidelines. And just like the OSHW community, they seem to be broken all too often. Some industrious members will come up with innovative products to improve the community, working publically on the forum to improve their product idea only to see another ‘member’ steal the design and beat them to production. As a result, I’ve seen much fewer public design collaborations on the forum the past 2 years than I did my first year lurking the scene.
I have contributed some of my own designs to the community. I designed my own ESP8266 based WIFI pixel controllers and Renard adapters. I stared working on the firmware for said adapters, but was pleasantly surprised to find another member doing the same and scrapped my code for his, and contributed to his code base where I saw fit. So not all is lost in respect to Open Source in the community.
Websites and Other Drama
As much as I saw drama over the theft of open collaboration designs, I’ve heard there is history of drama over websites. I’ve found a good handful of forums all about DIY Christmas lights, more than are needed and some more active than others. I’ve heard from long time community members that forums would rise, something would cause a schism, people would join sides and part of the community would split off into another new forum.
Right now, it seems DoItYourselfChristmas is the most active and the one I commonly check. It’s also the most extensive Wiki to go through to get caught up. Another is DIYChristmas. There are also vendor/product specific forums like Falcon Christmas that are good to bookmark as well.
Vendors
As much as the community is called DIY Christmas it’s more so reflected in the purchasing of the supplies you’ll need. You won’t find any of this stuff at a big box store. A lot of the websites you can use to buy supplies were started and run by community members. Profit margins are thin and non-existent, as are warranties in most cases, so don’t get bent out of shape if one pixel in your order of 2000 is DOA and the ‘vendor’ won’t send you another string. If you need 2000 pixels, order 2100 and have some spare. This is a cut it out and replace kind of community, not a return it to the store one.
Pixels
Pixels themselves can be bought in a few ways. A popular way is from AliExpress, aka directly from China. The go to Aliexpress store is RayWu. But I prefer another route, namely DIYLEDEXPRESS. It’s run by a few forum members who take time to design their own products, line up manufactures in China, bulk all member orders and slow boat freight it over to save shipping costs. They sacrifice their own garages to handle local distribution. All while keeping an eye on quality issues and adjusting design or manufacturing as need arises. It may be a few cents more expensive then direct from China, but I like the added benefit. There have been some quality issues with pixels from RayWu, but I’ve seen little issues with DIYLED pixels.
DIYLEDExpress and other sites operate in a seasonal purchasing type schedule. The concept is called ‘presale’ and it means there’s a limited window to place your orders. The first presale takes place January to February and you’ll get your order in by June. The second presale takes place around June and you’ll get it in around September.
Controllers
As there are many types of controllers, there are many places you have to go to get them. Renards are typically purchased as kits through the forum. Falcon controllers come from the Falcon Christmas store. Adapters like the e1.31 bridge, which connects Renards to the network for sACN control come from DIYLEDExpress.
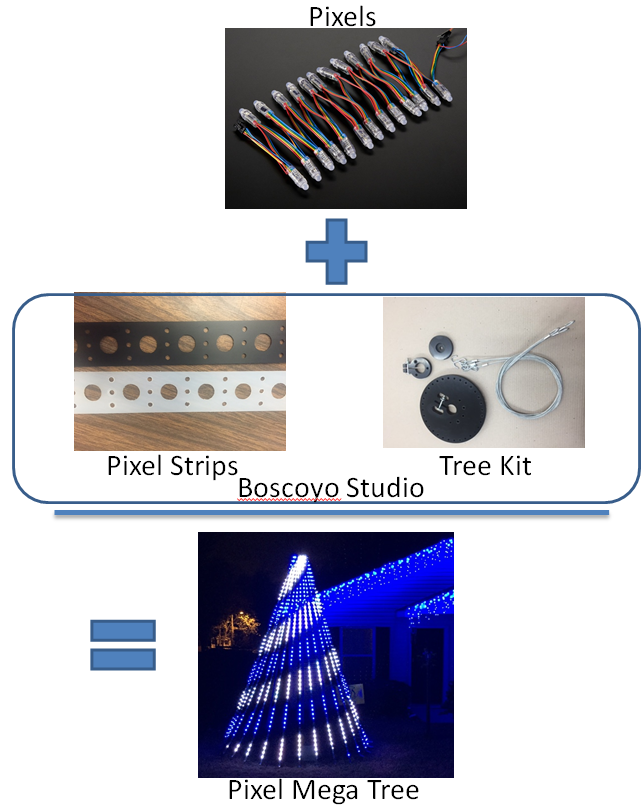
Supporting Hardware
The advent of pixels saw an explosion of supporting material. The best source is Boscoyo Studio. This is another good case of an industrious forum member who had some good ideas and turned it into a small business. He sells pixel strips, mega tree kits, and a whole bunch of other elements that streamlines display creation.
Pixel strips were/are a major milestone in the community.
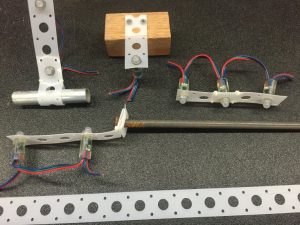
They made it much easier to create pixel grids, pixel trees, pixel poles, etc. Boscoyo sells strips and all the hardware needed to create any of these elements. They wisely designed their products to use EMT conduit from your local hardware store to make part sourcing much easier.
He also sells various cutouts made from coroplast or corrugated plastic sheets. This includes things like stars, snowflakes, tombstones (Halloween) etc. All pre-cut and ready for pixels. Seriously, one of the first things you should do is browse around Boscoyo Studio and start picking out what elements you want to build using his kits.
Design Approaches and other Terminology
The name of the game with pixels is combatting voltage drop and noise on the data lines. Most of my display is 5V and I use the common 3 pin 18 AWG connector as data in/out connections on my elements. But I also piggy back a large 14 AWG gauge power connector too. My mini trees are a good example. Each tree has 70 pixels, 50 in the tree and 20 in the star. I split the power wires at the interface between pixel 50 and 51 on the star and ‘inject’ power there. This premise is aptly called ‘power injecting’. But power can also enter from the input 3 pin connector and output 3 pin connector. The result, logically, is a strand of 280 pixels that is fed power from the first pixel, and has power ‘injected’ after the first 50 pixels and again every 70 pixels. A good rule of thumb for 5V is to never have more than 50 pixels away in either direction from a power injection point.
![]()
The length of the data wire can become an issue too. Longer runs can see glitching from noise on the data line. To combat this, a ‘null pixel’ is used. This works because every pixel receives and retransmits the data line, so each pixel acts as a buffer. Most controllers will have provisions to add these null pixels to the beginning of a strand of pixels without requiring channels to be transmitted to that controller from the sequencer. Controllers will also have provisions to ‘zig-zag’ or flip sub groups of pixel data to account for the fact it’s easier to wire grids as an up-down zig zag, but the sequencer expects the start of each column to be at the bottom of the grid.
Audio and the FCC
O boy, this is one where a lot of the community can get in trouble. To make sure your neighbors don’t go crazy, it’s common to transmit your audio over FM instead of using PA speakers. There isn’t a great category for regulations that allow us to do this, but no one seems to have ever gotten in trouble. Just try to find a dead channel and be reasonable with your transmit power.
Equally, none of the hardware you can buy is has FCC logos on it. I’m not an expert, but something tells me products that send 800 kHz down long lengths of wire could never meet the “must not cause interference” aspect of the certification. And there are multiple members that have reported they lose all garage door remote control capability when they have their Christmas display running.
Next Step / Planning
Watch videos and lurk the forums to get ideas on what elements you want to start out with your first year. A pixel tree and some pixel trim is a good start. Buy the pixel tree kits, pixel strips and other supporting hardware from Boscoyo Studio. Figure out how many pixels you want and keep an eye out for the DIYLEDExpress presale notification on the forums or their Facebook. EDIT: It’s has STARTED! Download Xlights and/or Vixen 3 and start playing around with it to become familiar. Build up a model of your house, add the pixel tree and strips and import some music. You’ll want to have 1 or 2 sequences done by the time all of your hardware comes in by June. Build up the elements, test your controllers and prepare for Christmas!
I assume many of you have concepts of voltage drop, calculation load current, sizing power supplies down. If not, please browse around the Wiki and Forums for more beginner level information.
Here’s some videos of my own display this past holiday season:
Several images come from DoItYourselfChristmas forum and wiki.

Trackbacks / Pingbacks